How to switch web hosting without downtime or data loss
Affiliate Disclosure: This article contains affiliate links. If you purchase a hosting plan through one of our links, we may earn a commission at no extra cost to you. Our recommendations are based on independent research and real-world testing. We only recommend services we genuinely trust.
If you need to switch web hosting, you have already done the hard part: the research, the support testing, the pricing comparison, and the final decision on a better provider. Now comes the part that makes most site owners hesitate: knowing how to switch web hosting without breaking something in the process.
The fear is understandable. Your website is live, people are visiting it, maybe orders are coming in or leads are being captured. But here is what I have learned from doing this dozens of times across different platforms and hosting environments: knowing how to switch web hosting correctly makes the process genuinely low-risk. The sites that go down during migrations almost always do so because someone skipped a step or rushed the DNS cutover without understanding how propagation works.
This guide walks through how to switch web hosting in the correct order, from backing up your files to verifying everything is working on the new host before you cancel your old account. If you are still deciding which host to move to, our complete beginner’s guide on how to choose a web hosting service in 2026 covers the full evaluation framework. If you have already chosen your new host but want to make sure it can handle your business needs, our guide to web hosting for small business helps you verify you are making the right move before you start the migration process.
For site owners making their first migration, [] SiteGround [] includes a free professional migration service on all plans and assigns a dedicated technician to handle the transfer.
[] Visit SiteGround – Get Free Migration []
Before you touch anything: the pre-migration checklist

Knowing how to switch web hosting safely starts with preparation, not with uploading files to the new server.
Rushing into a migration without preparation is where things go wrong. Before you log into your new hosting account and start transferring files, work through this checklist completely.
Confirm your new hosting environment is ready
Log into your new hosting account and verify that the plan is active, the control panel is accessible, and you can create databases. If your site runs WordPress, confirm that the new host supports your required PHP version. WordPress currently recommends PHP 8.1 or higher. Some budget hosts still default to older versions that affect plugin compatibility in ways that are not immediately obvious.
Check that SSL is available and configured on your new hosting account. You want HTTPS working on the new host before you point your domain there, not after.
Document your current server configuration
Before migrating anything, write down the key configuration details of your current hosting environment.
- PHP version currently in use
- MySQL or MariaDB version
- Any custom PHP settings such as memory limit, max execution time, and upload file size
- Email accounts and their configurations
- Any cron jobs running on the current server
- Active SSL certificate details
This documentation becomes your replication checklist on the new host. Skipping it is how you end up troubleshooting mysterious post-migration errors that would have been obvious if you had noted a PHP version mismatch beforehand.
Confirm your domain registrar access
Confirm that you have active login access to wherever your domain is registered. You will need this to update DNS records at the right moment in the migration. If your domain is registered through your current host and you have lost the login credentials, recover them now rather than during the migration when you are under pressure.
Step 1: create a complete backup of your current site
The most important rule when you switch web hosting is to never move a single file before you have a complete verified backup stored outside your current hosting account. This step is non-negotiable when learning how to switch web hosting safely. Before you move a single file, you need a complete, verified backup of your current site stored somewhere other than your current hosting account.
What a complete backup includes
A complete site backup has two components that must both be captured.
Files means everything in your public_html directory, including your CMS core files, theme files, plugin or extension files, uploaded media, and any custom configuration files. For WordPress, this means the entire wp-content directory plus wp-config.php.
Database means the MySQL or MariaDB database that stores your content, user accounts, settings, and transactional data. A file backup without the database backup is incomplete. Your site cannot be restored from files alone if it is database-driven.
How to create the backup
Through your host’s control panel: most cPanel-based hosts include a Backup Wizard tool that produces a single archive file containing both files and databases. Initiate the backup, wait for it to complete, and download it to your local computer.
Through a WordPress plugin: UpdraftPlus is the most widely used WordPress backup plugin and it is free for the core functionality. Install it, configure it to back up both files and database, run a manual backup, and download the backup files to Google Drive or Dropbox as a second copy.
Through manual database export: log into phpMyAdmin through your current host’s control panel, select your database, and use the Export function to download a .sql file.
Verify the backup before proceeding
Open the backup archive and confirm that the key directories are present. Open the .sql export in a text editor and confirm it contains actual SQL statements rather than an error message. This takes five minutes and eliminates the scenario where you discover mid-migration that your backup is corrupted or incomplete.
According to Google’s website reliability engineering documentation, verifying backups before relying on them is one of the most critical steps in any infrastructure migration. A backup you have not verified is not a backup you can rely on.
Step 2: set up your site on the new host

With a verified backup in hand, you are ready to build the site on the new hosting environment while your domain still points to the old server. This is what makes knowing how to switch web hosting low-risk. You are building and testing on the new host with zero impact on live visitors.
Choosing the right host for your migration
Before uploading anything, make sure the host you are moving to is genuinely better than what you are leaving. Here are the three providers we recommend most often for site owners making a migration in 2026.
| Host | Starting price | Free migration | Best for | Deal |
|---|---|---|---|---|
| SiteGround | $2.99/mo | Yes | WordPress, small business | [] See Deal [] |
| Kinsta | $35/mo | Yes | Managed WordPress, agencies | [] See Deal [] |
| WP Engine | $20/mo | Yes | eCommerce, high-traffic sites | [] See Deal [] |
Create the database on the new host
Log into your new host’s control panel and create a new MySQL database. Create the database, create a database user, assign the user to the database with full privileges, and note all three credentials: database name, username, and password.
Upload your files
File Manager works for smaller sites. Navigate to the public_html directory, upload your backup archive, and extract it. For larger sites, the file manager upload can time out, so use FTP in that case.
FTP or SFTP works better for larger sites. Use an FTP client like FileZilla. Connect to your new host using the FTP credentials from your control panel and upload your files. SFTP is preferable to standard FTP because it encrypts the transfer on port 22.
Import the database
Log into phpMyAdmin on your new host through the control panel. Select the database you created, go to the Import tab, and upload your .sql backup file. For databases larger than 50MB, phpMyAdmin may time out during import. In that case, use a tool like BigDump or import via SSH command line if you have that access level.
Update the database connection settings
After importing the database, update your site’s configuration file with the new database credentials. For WordPress, this is the wp-config.php file in the root directory. Update these four values.
- DB_NAME: your new database name
- DB_USER: your new database username
- DB_PASSWORD: your new database password
- DB_HOST: usually localhost on shared and VPS hosting
This single step is the most commonly missed item in a WordPress migration and the most common cause of the error establishing a database connection message post-migration.
Step 3: test the site on the new host before changing DNS
One of the most common mistakes site owners make when they switch web hosting is changing their DNS records without first lowering the TTL to minimize propagation time.
Knowing how to switch web hosting correctly means testing everything before touching DNS. Use your computer’s hosts file to preview the site on the new server without affecting live visitors.
On Mac or Linux, the hosts file is at /etc/hosts. On Windows, it is at C:\Windows\System32\drivers\etc\hosts. Open it with administrator privileges and add a line in this format.
[new host IP address] yourdomain.com
Save the file, open your browser, and navigate to your domain. You will see the site as it exists on the new server. Test everything on this checklist before proceeding.
| What to test | What to look for |
|---|---|
| Home page and interior pages | Load without errors, layout intact |
| Images and media files | Display correctly, no broken file paths |
| Contact forms | Submit successfully, deliver to correct email |
| eCommerce checkout | Cart, checkout flow, test transaction if possible |
| Admin login | Dashboard accessible, no permission errors |
| SSL certificate | Active, no browser security warnings |
| Page load speed | Comparable to or faster than old host |
| Custom functionality | Membership areas, booking systems, plugins |
Remove the hosts file entry when you finish testing. It only affects your local machine and no one else sees the new host version during this testing phase. Before making any DNS changes, test your full page load speed on the new host using Google PageSpeed Insights to confirm the new environment performs as well as or better than your current host.
Step 4: lower your DNS TTL before the cutover
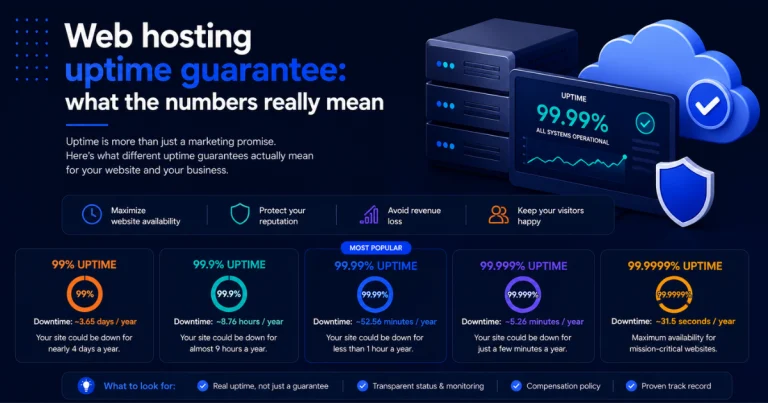
TTL stands for Time to Live. It controls how long DNS resolvers cache your records before checking for updates. The default TTL on most domains is 86,400 seconds, which is 24 hours. If you change your DNS records with a 24-hour TTL in place, propagation can take up to a full day.
To compress that window, log into your domain registrar one to two days before the planned migration and lower the TTL on your A record to 300 seconds, which is five minutes. Wait for the existing TTL period to expire before making the actual DNS change. After that, when you update the A record to point to your new host’s IP address, propagation completes for most users within 15 to 30 minutes.
This step is essential when learning how to switch web hosting with minimal downtime. Lowering the TTL is something you do a day or two before the migration, not five minutes before you change the DNS record.
Step 5: update your DNS records
With the site verified on the new host and your TTL lowered, you are ready to make the switch. Log into your domain registrar and update the A record for your domain to point to your new host’s IP address. If you have a separate A record for www, update that as well.
What to expect during propagation
Even with a low TTL, DNS propagation is not instantaneous. For the period while records are propagating, typically 15 minutes to a few hours, some visitors will reach the old server and some will reach the new one. Do not make content changes to your site during this window.
For eCommerce sites with continuous order flow, schedule the DNS cutover during your lowest-traffic period, typically between midnight and 4 a.m. in your primary customer time zone.
You can verify your DNS propagation status in real time using whatsmydns.net a free tool that checks your domain resolution from multiple geographic locations simultaneously so you know exactly when the cutover is complete. When the majority of locations show the new IP address, the cutover is substantially complete.
Step 6: migrate your email
If your email is hosted through your current hosting provider, migrate it separately before canceling your old account. Export your mailbox data through your email client before making any server-side changes. Create matching email accounts on the new host and update your MX records at the same time as your A record.
A hosting migration is also a natural moment to consider separating web hosting and email hosting entirely. Google Workspace and Microsoft 365 both run $6 per user per month and provide email infrastructure that is completely independent of your web hosting environment. An issue with your host then has no impact on your email, and vice versa.
Step 7: keep the old account active until you are certain
Keep your old hosting account active for at least two weeks after DNS propagation is complete. Monitor the new site under real traffic, confirm all functionality is working correctly, and verify that your backup solution is capturing backups on the new environment.
Once you have run two weeks of clean operation on the new host, you can cancel the old account with confidence. Download one final backup from the old account before canceling.
Free migration: when to use it and when to be careful
If you are using a free migration service to switch web hosting, always take your own independent backup before handing over access to your hosting credentials. Many hosts offer free website migration as a sign-up incentive. This can be genuinely useful when learning how to switch web hosting for the first time. The caveats worth knowing are that free migrations are usually limited in scope, quality varies between providers, and you should still take your own backup before handing over access regardless of who is doing the migration work.
Hosts with consistently positive migration feedback include [] SiteGround [], Kinsta, and WP Engine.
The migration sequence at a glance
| Timing | Action |
|---|---|
| 1 to 2 days before | Lower DNS TTL to 300 seconds |
| 1 to 2 days before | Take verified full backup of files and database |
| 1 to 2 days before | Document current server configuration |
| Migration day | Set up new environment, upload files, import database |
| Migration day | Update configuration files |
| Migration day | Test using the hosts file, confirm checklist passes |
| Cutover | Update DNS A record and MX records |
| Post-cutover | Monitor propagation using whatsmydns.net |
| Post-cutover | Keep old account active for two weeks |
| After two weeks | Cancel old account after confirmed clean operation |
Knowing how to switch web hosting correctly removes almost all the risk that makes people hesitate before making the move. The technical steps are straightforward when done in the right sequence, and the verification process using the hosts file eliminates the most common source of migration stress.
The sites that have problems during migrations are almost always the ones that skip the testing phase or rush the DNS cutover without lowering the TTL first. Follow the sequence in this guide, do not skip steps, and your visitors will never notice the transition happened.
For site owners who want professional help with the migration process, [] SiteGround [] offers free professional migration on all plans, handled by a dedicated technical team that verifies the site is working correctly before updating DNS.
[] Visit SiteGround – Start Your Free Migration Today []
If you have arrived at this guide still deciding whether your current host is worth keeping or whether the performance issues you are seeing are fixable, our detailed breakdown of what web hosting uptime guarantees actually mean and how to verify them independently gives you the data framework to make that call objectively before committing to a migration.